
How to install Skirting – Issue 11 March 2022
Welcome back to our newsletter! March is here, which means spring is around the corner. Who is ready for that spring warmth? This newsletter we will explain and show you the manufactured home skirting and how you can install it yourself.
There are different brands of skirting that are similar but not the same. Some are interchangeable among them and others are not. Style Crest’s Premium Plus line of skirting is a .040 thickness. It comes in white, clay, grey, tan and sand as our primary colors. We also offer exclusive Charcoal and chocolate colors featuring armor coat ASA capstock resin for great protection. Note: Colors might not look exactly as shown on screen.

You can purchase skirting per piece or as a whole package to do at home. The panels come in 16” wide by 140” long (11’6’’). The trim comes in 11’ length. You can also purchase our skirting in cut pieces on our website.
Products:
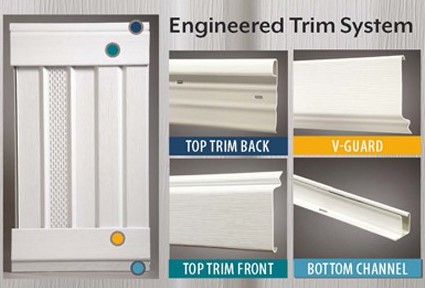
Premium Plus Vented Skirting Trim and Rail Kit
Premium Plus Vented Skirting Replacement Panel Bundle
To install the skirting, you will need:
- A drill
- A level
- A flat shovel
- A hammer
- A pair of snips
- A circular saw
Instructions
1. Start by screwing on the top mount trim. After all top mount is on, use the shovel to even out the ground, and use your level from the mount to the inside lip of the ground channel.

2. When it is
leveled, drive the spike into the ground with the hammer. Next, measure the height from the bottom of the trim to the middle of the mount.
*At the corners, cut a “V” shape at 45 degrees on the inside lip (Not shown on video).

3. Level the panel side to side, and screw it on top or to the bottom trim but not both. Each panel can be slid into the next. Every third panel should be leveled and screwed.

4. When all the panels are
installed place the top trim, which snaps into the mount for a nice and clean
finish. This finishes
the skirting. You can access under the home at any point of the skirting.
*At the corners, cut a “V” shape at the top of the trim (not shown on video).
Ask our staff about the different accessories we offer.
If you are still having doubts about how to install skirting, you can find another set of instructions that are more detailed here.
These panels are not refundable as they will have been cut for your order so please be sure you are willing to accept slight variations in color before you finalize your order. Please call us if you have questions about the skirting. Thank you for reading our newsletter. Contact us if you have any questions or inquiries. Albuquerque: (505) 831-1601 and Las Cruces (575) 680-2217.
----------------------------------------------------------------------------
Español
Como instalar falda para casas prefabricadas.
Bienvenidos a otro mes más de nuestro boletín informativo. Es marzo, lo que significa que la primavera esta por llegar. ¿Quién esta listo para los días más calidos? Este mes traemos información sobre las faldas para casas móviles y como las puedes instalar tu mismo.
Existen varias marcas de faldas que son similares pero no iguales. Algunas se pueden intercambiar entre ellas pero otras no. La linea de falda Premium Plus de Style Crest es de .040 de grosor en nuestros colores primarios- blanco, barro, gris, café claro y arena. También ofrecemos colores esclusivos como carbon y chocolate presentando una capa armada de resina ASA para mejor protección. Nota: Los colores pueden no ser exactamente como se muestran en la pantalla.
Puedes comprar la falda por pieza o en paquete completo para instalar tu mismo. Los paneles son de 16” de ancho por 140” de largo (11’ 6”). La moldura es de 11’ de largo. También puedes comprar falda cortada en pedazos en nuestra página de internet.
Productos:
Kit de moldura y borde para falda con ventilación Premium Plus
Juego de paneles de remplazo con ventilación Premium Plus
Juego de herramientas para falda de casa móvil
Para instalar la falda necesitas:
- Un taladro
- Una herramienta de nivel
- Una pala plana
- Un martillo
- Un par de tijeras
- Una sierra circular
Instrucciones
1. Empieza por atornillar la parte superior de la moldura. Despues de que toda la moldura este puesta, usa la pala para nivelar el piso y usa la herramienta de nivel desde la parte superior hacia la parte interna del piso para asergurarte que quede parejo.
2. En seguida, mide la altura desde la parte inferior de la moldura hacia la mitad de la moldura base. Nivela el panel de lado a lado y atornillalo arriba o abajo de la moldura pero no en ambas. Cuando este nivelado, introduce el clavo en el suelo con el martillo y corta una “V” a 45 grados en la parte de adentro del labio.(No se muestra en video)
3. Cada panel puede deslizarce en seguida del otro. Asegurate de que cada tercer panel este nivelado y atronillado.
4. Cuando todos los paneles esten instalados pon la moldura superior, la cual se ensambla con un clic para un terminado visual más limpio. Para terminal la instalación de la falda, en las esquinas, corta una “V” en la parte superior de la moldura (no se muestra en video). Ahora puedes acceder debajo de la traila en cualquier punto de la falda.
Pregunta a nuestros empleados sobre los accesorios que ofrecemos.
Si tienes mas dudas de como instalar falda en tu casa móvil, AQUÍ puedes encontrar instrucciones más detalladas.
No se aceptan devoluciones en los paneles dado a que serán cortados a medida. Compar estos paneles estas aceptando una pequeña variación en el color. Gracias por leer nuestro boletín informativo. Contáctanos si tienes alguna pregunta o duda sobre la falda para casa móvil. Nuestras locaciones son: Albuquerque: (505) 831-1601 and Las Cruces (575) 680-2217.